
In This Tutorial
The ArcGIS geocoding tutorial has the following exercises:
This tutorial will show you how to match addresses using ArcGIS software. You’ll get step-by-step instructions and sample data to help you learn how to use geocoding with ArcGIS Desktop. You’ll learn how to create address locators and use geocoding tools.
What You Need to Know
You should already know how to use ArcCatalog and ArcMap for some parts of this tutorial. For example, you need to know how to copy data to a new location and add data to a map. You should also understand what a geodatabase is and what it can contain. If you’re new to GIS or need a refresher, take some time to read “What is ArcMap?”.
You can download the data for this tutorial from arcgis.com. Go to the geocoding tutorial data page, click Open > Download, and save the file on your computer. Unzip the downloaded file. It is recommended that you save the Geocoding folder to: C:\ArcTutor\Geocoding. This location will be used throughout the tutorial, so saving it there will make following the instructions easier.
Creating an address locator
Complexity: Beginner
Data Requirement: ArcGIS Tutorial Data for Desktop
Data Path: c:\ArcGIS\ArcTutor\Geocoding
Goal: To create an address locator
Legacy
Store locators in a file folder to use new features not supported in geodatabases, like performance boosts, multithreading, and suggestions. ArcGIS 10.4 is the last version to support storing locators in geodatabases.
In this tutorial, you’ll learn how to create a new address locator. An address locator helps convert written locations into map features. They are stored in a folder you choose. The first step is creating an address locator using your copy of the Atlanta file geodatabase.
Get the Data
The data for this tutorial is available for download on arcgis.com.
- Go to the item description web page of the geocoding tutorial data on arcgis.com.
- Click Open > Download, and save the file locally.
- Unzip the downloaded file.
- It’s recommended to save the downloaded Geocoding folder to: C:\ArcTutor\Geocoding. This location will be used throughout the tutorials, so save it here to make instructions clearer.
Create an Address Locator
To create an address locator, follow these steps:
- Start ArcCatalog.
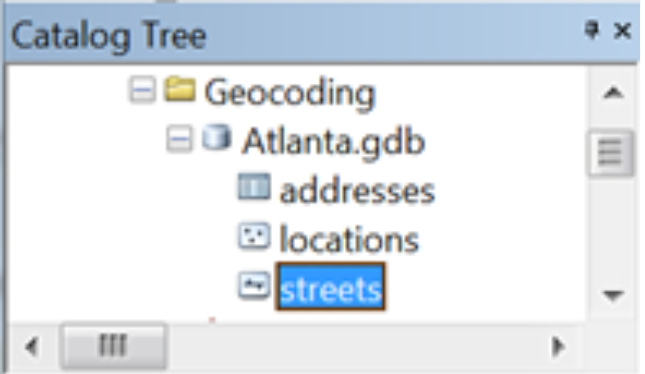
- Browse to the Geocoding folder of the tutorial data that contains the Atlanta file geodatabase.
- Right-click in the empty space of the Contents tab inside the Geocoding folder containing the Atlanta geodatabase, and click New > Address Locator.

The Create Address Locator dialog box appears.
- Click the browse button next to the Address Locator Style text box to open the Select Address Locator Style dialog box.

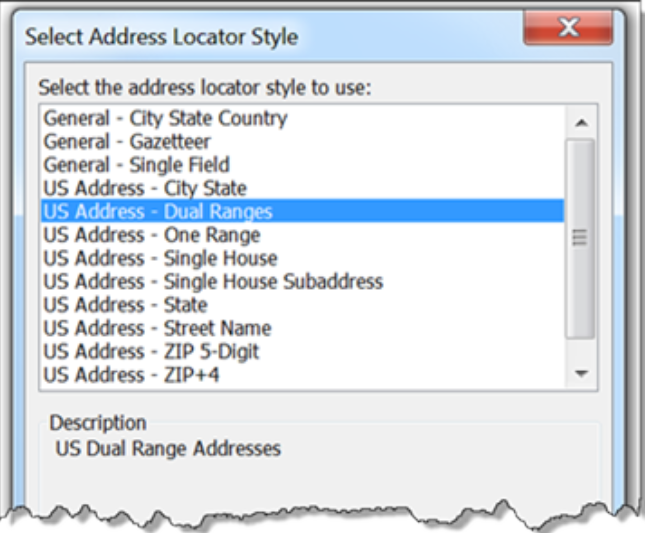
Choose the US Address – Dual Ranges address style and click OK.
- Click the browse button next to the Reference Data text box.
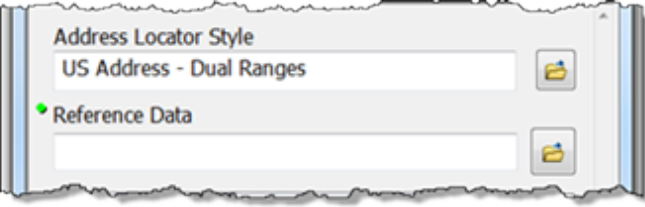
The Reference Data dialog box appears.
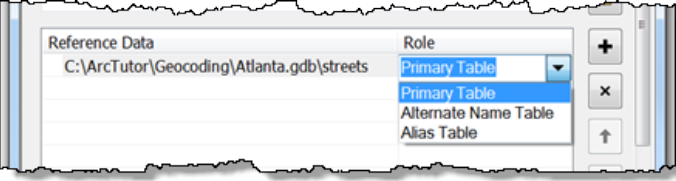
- Browse to the Atlanta file geodatabase, choose the streets feature class, and click Add.
You can also drag and drop the streets feature class from the workspace to the Reference Data text box in the dialog box.
- On the Create Address Locator dialog box, click the arrow under the Role column heading and click Primary Table.
- The Field Map section should be completed automatically. If not, choose the appropriate field in the reference data for each address locator field.
Fields with an asterisk (*) next to their names are required by the address locator style. These fields must be mapped with valid fields in the reference data. Nonrequired fields can be left as <None> if they don’t apply.
Next, set the output path for the locator.
- Click the browse button next to the Output Address Locator text box.
The Output Address Locator dialog box appears. - Browse to the Geocoding folder that contains the Atlanta geodatabase, type Atlanta in the Name text box, and click Save. The output path is displayed on the Create Address Locator dialog box.

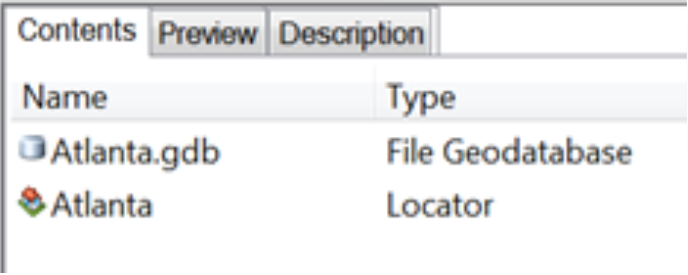
- Click OK to begin creating the address locator. When the process finishes, the new address locator appears in the Geocoding file folder alongside the Atlanta geodatabase.
Creating a composite address locator
Data Requirement: ArcGIS Tutorial Data for Desktop
Data Path: C:\ArcGIS\ArcTutor\Geocoding
Goal: To create a composite address locator
In this tutorial, you’ll learn how to create a composite address locator.
A composite address locator consists of two or more individual address locators that help match addresses using multiple locators to find the best matches. For example, a composite address locator may include a street address locator and a ZIP Code locator. If an address doesn’t match with the street address locator, it can try to match with the ZIP Code locator.
Like other address locators, composite address locators are stored in a folder of your choice. Before creating a composite address locator, you need to find or create the address locators you want to include in it.
Legacy
Locators should be stored in a file folder to take advantage of new features not supported for locators stored in geodatabases, like performance improvements, multithreading capabilities, and suggestions support. ArcGIS 10.4 is the last version to support storing locators in geodatabases.
Get the data
The data for this tutorial can be downloaded from arcgis.com.
- Go to the item description page of the geocoding tutorial data on arcgis.com.
- Click Open > Download, and save the file locally.
- Unzip the downloaded file.
- It is recommended to save the downloaded Geocoding folder to: C:\ArcTutor\Geocoding. This will be referred to throughout the tutorials, so saving in the same location will make instructions clearer.
Create a composite address locator
To create a composite address locator, follow these steps:
- Start ArcCatalog.
- Browse to the Geocoding folder of tutorial data that contains the Atlanta file geodatabase.
- Right-click in the empty space of the Contents tab inside the Geocoding folder, and click New > Composite Address Locator.

The Create Composite Address Locator dialog box appears.
- Click the browse button next to the Address Locators text box.

The Address Locators dialog box appears.
- Browse to the Geocoding folder containing the Atlanta file geodatabase, choose the Atlanta address locator, and click Add.
Tip:
Tip: You can also drag and drop locators from the Catalog Tree directly into the Participating Address Locator section of the Create Composite Address Locator dialog box.
- Repeat step 4, browse to the Geocoding folder again, choose the Postal_US locator, and click Add.

The two address locators now appear in the Participating Address Locators section. Each locator is given a name automatically. Field mapping for all the participating address locators is also created automatically. These fields become the input fields for the composite address locator.

Changing the Selection Criteria section is optional.
- Make sure the output composite locator will be stored in the folder that contains the Atlanta geodatabase by following these steps:
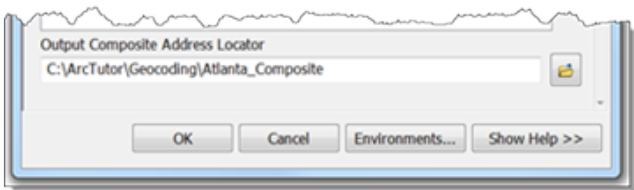
- Click the browse button next to the Output Composite Address Locator text box.
The Output Composite Address Locator dialog box appears. - Browse to the Geocoding folder that contains the Atlanta geodatabase.
- Type Atlanta_Composite in the Name text box.
- Click Save to accept the changes and close the dialog box.
The output path appears in the Output Composite Address Locator text box.
- Click OK to start creating the composite address locator.
When the process finishes, the new composite address locator appears in the Geocoding folder that contains the Atlanta geodatabase alongside the two locators used to create it.

Exercise 3: Finding addresses
Complexity: Beginner
Data Requirement: ArcGIS Tutorial Data for Desktop
Data Path: C:\ArcGIS\ArcTutor\Geocoding
Goal: To find addresses using the Geocoding toolbar and Find tool
In this tutorial, you’ll learn how to find an address using the Geocoding toolbar and the Find dialog box in ArcMap.
Get the data
The data for this tutorial can be downloaded from arcgis.com.
- Go to the item description page of the geocoding tutorial data on arcgis.com.
- Click Open > Download, and save the file locally.
- Unzip the downloaded file.
Find an address using the Geocoding toolbar
- Start ArcMap.
- If the Geocoding toolbar is not visible, click Customize > Toolbars > Geocoding to add it.
A list of default locators, including a geocoding service from ArcGIS Online and a Military Grid Reference System (MGRS) locator, have been added to ArcMap. You can use these locators to find addresses or locations.
- Click the Catalog button on the Standard toolbar to open the Catalog window.
- Browse to the Geocoding folder containing the Atlanta geodatabase, and drag and drop the streets feature class from the geodatabase to the map display.
- Click the Manage Address Locators drop-down arrow on the left side of the Geocoding toolbar and click Manage Address Locators.

The Address Locator Manager dialog box appears.
- On the Address Locator Manager dialog box, click the Add button to open the Add Address Locator dialog box.
- Browse to the Geocoding folder that contains the Atlanta file geodatabase, and double-click the Atlanta address locator.
The Address Locator Manager dialog box closes, and the Atlanta locator is added to the list in the Address Locator Manager dialog box.
Tip:
Instead of using the Address Locator Manager to add a locator to ArcMap, you can click and drag a locator from the Catalog window and drop it on the map area or Table of Contents.
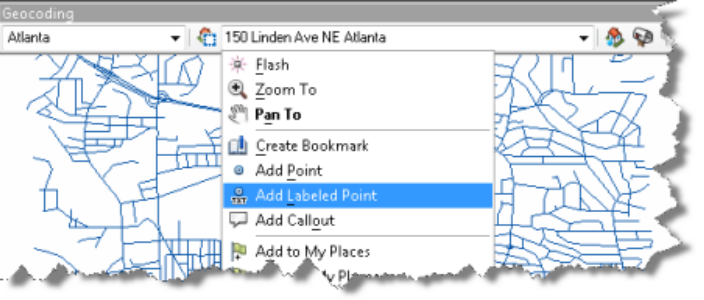
- Click the Type an address text box, type 150 Linden Ave NE Atlanta, and press Enter.

A ToolTip appears showing the full address returned by the locator, and the point location on the map flashes.

- Right-click the address on the Geocoding toolbar and click Add Labeled Point to add the graphic point and its label to the map.
- Type 500 feet NW from 150 Linden Ave NE Atlanta in the Find Address text box and press Enter. Right-click the address and add it to the map as a labeled point.
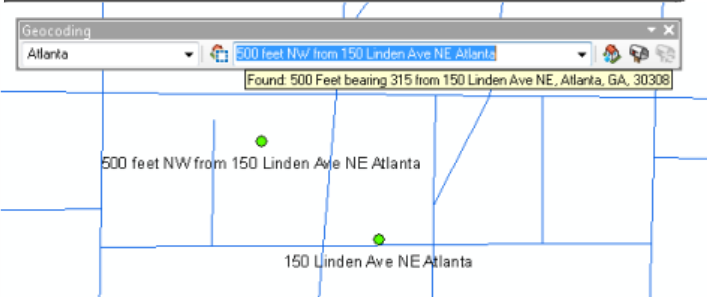
Find address with spatial offset Address locators created in the current version of ArcGIS support finding an address based on a spatial offset. The spatial offset can be presented as 100 feet NW from [an address] or in any other distance, linear unit, or direction from the address. Instead of specifying a direction, you can provide a bearing degree, for example, 200 yards bearing 70 from [an address].
Take a moment to choose one of the default locators from the Geocoding toolbar and search for addresses that you know.
Find an address using the Find dialog box
- Click the Find button on the Tools toolbar.
- On the Find dialog box that appears, click the Locations tab.
- Click the Choose a locator drop-down list and click Atlanta.
- Type 300 Peachtree St NE 30303 in the Full Address text box and press Enter, or click Find to search for candidates.
Found candidates ranked by score are shown at the bottom of the dialog box. You can see more candidates by checking the Show all candidates check box. - Right-click the first candidate in the list and click Add Point in the context menu.

A graphic point representing the location of the address appears on the map.
Optionally choose one of the default locators from the Choose a locator drop-down list and search for any addresses you know.
- Click Cancel to close the Find dialog box.
Geocoding addresses in a table and re matching unmatched addresses
Complexity: Beginner
Data Requirement: ArcGIS Tutorial Data for Desktop
Data Path: c:\ArcGIS\ArcTutor\Geocoding
Goal: To geocode a table of addresses and rematch the geocoded feature class
Get the data
The data for this tutorial can be downloaded from arcgis.com.
- Go to the item description page of the geocoding tutorial data on arcgis.com.
- Click Open > Download, and save the file locally.
- Unzip the downloaded file.
Geocoding addresses in a table
If you have a table with addresses, you can geocode all the addresses at once. In this exercise, you’ll start with a table of customer addresses and geocode the entire table to show where the customers are located.
- Open a new map document in ArcMap. You don’t need to save the map you created in the previous task.
- Add the Streets feature class and the customers table from your copy of the Atlanta geodatabase to your map.
- Right-click the customers table in the List by Source view of the Table of Contents and click Geocode Addresses in the context menu.
- Click Add in the Choose an address locator to use dialog box.
The Add Address Locator dialog box opens. - Browse to the Geocoding folder that contains the Atlanta geodatabase, click the Atlanta address locator, and click Choose.
The Geocode Addresses: Atlanta dialog box appears. - In the Address Input Fields section, click Multiple Fields and select the input fields, if they are not already selected.
- In the Output section, click the browse button to define the output feature class.

The Saving Data dialog box appears.
- Click the Save as type drop-down arrow and choose File and Personal Geodatabase feature classes.
- Browse to your copy of the Atlanta geodatabase and double-click the geodatabase. In the Name text box, type Atlanta_Results.
- Click Save.
A new point feature class named Atlanta_Results will be created in the Atlanta geodatabase, saving the point features generated by the geocoding process.
- Click OK to start geocoding.
The Geocoding Addresses dialog box shows the matching statistics and progress bar for the matching process.
When the geocoding process finishes, the Geocoding Addresses dialog box shows the final statistics of the addresses that were matched or not matched. In this tutorial, three addresses failed to match and one address is tied. You’ll rematch the unmatched addresses later.
- Click Close to close the Geocoding Addresses dialog box.
A Geocoding Result layer is added to the map, showing the points added to the Atlanta_Results feature class.
Rematching addresses
- Select the Geocoding Result: Atlanta_Results layer in the Table of Contents and click the Review/Rematch Addresses button on the Geocoding toolbar.
The Interactive Rematch dialog box opens.

- The Interactive Rematch dialog box displays the records in the geocoded feature class at the top. There are three addresses that were not matched. To rematch them, click the Show results drop-down arrow and choose Unmatched Addresses. The result will show three records, with the first one automatically selected. Sometimes an address isn’t matched because a perfect match isn’t found, but there are close match candidates. These are listed in the Candidates section.
- Arrange the ArcMap window and the Interactive Rematch dialog box so you can see the map.
Near the center of the map, you’ll see a few points highlighted: one in yellow and the others in cyan. These are the candidate locations listed in the dialog box. The selected candidate is highlighted in yellow on the map.
- Click the Zoom In button on the Tools toolbar and drag over the area of the candidates to zoom in.
- Click the fourth candidate in the list. The location of the yellow highlighted candidate changes on the map.
- Click the Match button at the bottom of the dialog box. The selected address is now associated with the fourth candidate and the Status field changes from U to M. The list of unmatched addresses is updated.
Rematching addresses by picking a point location on the map
- The result set shows two addresses that weren’t matched.
- Arrange the ArcMap window and the Interactive Rematch dialog box so you can see the map.
- Click the Zoom In tool and drag over an area of the map.
Use the Pick Address from Map tool to match an unmatched address. When you know where it should be on the map:
- The result set shows two addresses that weren’t matched.
When you hover over the map, it shows a cross with a blue dot in the center. - Click and hold the mouse button along a street segment to display the nearest qualifying address in a ToolTip box. Hover over the desired location, right-click, and click Pick Address.
- Hover over the desired location.
- Right-click, and click Pick Address.

The unmatched address is now matched to the point location you picked.
- Click Close to close the Interactive Rematch dialog box.
Geocoding addresses using a composite address locator
In this exercise, the customers address table is geocoded against the composite address locator you created in Exercise 2. It shows how addresses are matched against multiple locators for the best matches.
- Right-click the customers table in the List by Source view of the Table of Contents and click Geocode Addresses.
- Click Add in the Choose an address locator to use dialog box.
The Add Address Locator dialog box opens. - Browse to the Geocoding folder with the Atlanta geodatabase, click the Atlanta_Composite locator, and click Add to close the Add Address Locator dialog box.
- Click OK to close the Choose an address locator to use dialog box.
The Geocode Addresses: Atlanta_Composite dialog box opens. - In the Address Input Fields section, if not already chosen, click the Street or Intersection drop-down list and choose ADDRESS. Choose CITY for the City or Placename field, STATE for State, and ZIP for the ZIP Code field.
- In the Output section, edit the path to the Atlanta geodatabase and change the result feature class name to Composite_Results.
- Click OK to start geocoding.
The Geocoding Addresses dialog box shows the matching statistics and progress bar.

You can see that only one address is not matched.
- Click Close.
The Geocoding Addresses dialog box closes, and a Geocoding Result layer is added to the map. The layer shows the points added to the Composite_Results feature class. - Right-click the Composite_Results layer and click Open Attribute Table.
The name of the participating address locator used to match the address is shown in the Loc_name field of the attribute table. Some addresses that didn’t match the Atlanta locator were matched by ZIP Code against the Postal_US locator.

- Close ArcMap. You don’t need to save the map document.
Exercise 5: Using alternate street name and place-name aliases
Complexity: Beginner
Data Requirement: ArcGIS Tutorial Data for Desktop
Data Path: c:\ArcGIS\ArcTutor\Geocoding
Goal: Create an address locator using alternate name and place-name aliases and find locations using those aliases.
When you create an address locator, you can use alternate names and place-name aliases. Place-name aliases let you link famous place names to street addresses, like museums, hospitals, or landmarks. When geocoding an address, the place-name alias table is checked first. If a place-name is found, the street address from the place-name alias table is geocoded. Similarly, alternate names can be set for features like streets or cities in the reference data. When geocoding an address, the alternate name table is also checked to find potential matches where streets or cities have more than one name.
Get the data
The data for this tutorial can be downloaded from arcgis.com.
- Go to the item description page of the geocoding tutorial data on arcgis.com.
- Click Open > Download, and save the file locally.
- Unzip the downloaded file.
Create an address locator that uses alternate names and place-name aliases
In this task, you’ll create a new address locator that uses alternate street names and place-name aliases. You’ll then use it in ArcMap to find addresses.
- In ArcCatalog, browse to the Geocoding folder containing the Atlanta geodatabase.
- Right-click in the empty space of the Contents tab inside the Geocoding folder, and click New > Address Locator. The Create Address Locator dialog box appears.
- On the Create Address Locator dialog box, click the Browse button next to the Address Locator Style text box.
The Select Address Locator Style dialog box appears.
- Choose the US Address – Dual Ranges address style.
- Click OK.
- Click the Browse button next to the Reference Data text box to open the Reference Data dialog box.
- Browse to the Atlanta file geodatabase, choose the streets feature class, and click Add.
- On the Create Address Locator dialog box, click the arrow under the Role column heading and choose Primary Table.
- Repeat steps 6 and 7, but this time browse to and add the altname table in the Atlanta geodatabase.
- Click the arrow under the Role column heading for the altname table and choose Alternate Name Table.
- The Field Map section should be completed automatically. If not, select the appropriate field in the reference data for each field. Make sure the JoinID fields for the Primary Table and Alternate Name Table are mapped properly. If they aren’t, follow these steps:
- Click the arrow under the Alias Name column heading for the Primary Table: Altname JoinID field and choose streets: JOINID.
- Click the arrow for the Alternate Name Table: JoinID field and choose altname: JOINID.

The JOINID field in the altname table and the JOINID field in the streets feature class are used to relate the records in the altname table to the records in the streets feature class.
- Repeat steps 6 and 7, but this time browse to and add the altcity table in the Atlanta geodatabase.
- Click the arrow under the Role column heading for the altcity table and choose Alternate City Name Table.
- The Field Map section should be completed automatically. If not, select the appropriate field in the reference data for each field. Make sure the JoinID fields for the Primary Table and Alternate City Name Table are mapped properly. If they aren’t, follow these steps:
- Click the arrow under the Alias Name column heading for the Primary Table: City Altname JoinID field and choose streets: JOINID.
- Click the arrow for the Alternate City Name Table: JoinID field and choose altcity: CITYID.

The CITYID field in the altcity table and the CITYID field in the streets feature class are used to relate the records in the altcity table to the records in the streets feature class.
- Repeat steps 6 and 7, but this time browse to and add the place_aliases table in the Atlanta geodatabase.
- Click the arrow under the Role column heading for the place_aliases table and choose Alias Table.
- The field mapping for the place_aliases table should be completed automatically. If not, select the appropriate field in the reference data for each address locator field. For the field named Alias Table: Alias, click the arrow under the Alias Name column heading and choose place_aliases: NAME. This field contains the names of the places you can use to geocode.

Next, set the path for the output address locator.
- Click the Browse button next to the Output Address Locator text box.
The Output Address Locator dialog box appears. - Browse to the Geocoding folder containing the Atlanta geodatabase, type Atlanta_AltName as the address locator name, and click Save to accept the change and close the dialog box.
- Click OK to start the process of creating the address locator. When the process finishes, the new Atlanta_AltName address locator appears in the Geocoding folder alongside the Atlanta file geodatabase.
- Close ArcCatalog.
You can now use this address locator to find where an address is located on a map.
Find locations using alternate street names, alternate city names, and place-name aliases
In this task, you’ll use the Atlanta_AltName locator you just created to find addresses.
- Open a new map document in ArcMap.
- Add the streets feature class from the Atlanta geodatabase to your map.
- Click the Find button on the Tools toolbar.
- On the Find dialog box, click the Locations tab.
- Click the Browse button next to the Choose an address locator drop-down box. The Add Locator dialog box opens.
- Browse to the Geocoding folder, choose the Atlanta_AltName locator, and click Add.
A street may have more than one name. For example, Atlanta Blvd is an alternate name for Old 10th St NE in the Atlanta database. With the Atlanta_AltName address locator, 30 Old 10th St NE and 30 Atlanta Blvd will both find the same location.
- Click the Browse button next to the Output Address Locator text box.
The Output Address Locator dialog box appears.

- Right-click the candidate in the candidate list and click Add Point. A graphic point representing the address’s location appears on the map.
- Type 30 Atlanta Blvd Atlanta in the Full Address text box and click Find to search for candidates.
- Right-click the found candidate and click Flash.
You can see that both addresses are matched to the same location on the map.
When searching for an address, the city name or neighborhood name within the city could be used to locate the address. For example, Sherwood Forest is a neighborhood within the city of Atlanta listed in the alternate city name table in the Atlanta database. With the Atlanta_AltName address locator, 192 Little John Trl NE, Atlanta and 192 Little John Trl NE, Sherwood Forest will both find the same location.
- Type 192 Little John Trl NE, Atlanta in the Full Address text box and click Find to search for candidates.

- Right-click the candidate in the candidate list and click Add Point. A graphic point representing the address’s location appears on the map.
- Type 192 Little John Trl NE, Sherwood Forest in the Full Address text box and click Find to search for candidates.
- Right-click the found candidate and click Flash. You can see that both addresses are matched to the same location on the map.
In addition to geocoding addresses, you can also geocode place-names defined in the place_aliases table.
- Type Atlanta Market in the Full Address text box and click Find to search for candidates.
- Right-click the first found candidate and click Add Point. The location appears on the map as if you had typed its complete address.
- Click Cancel to close the Find dialog box.
Creating locators that use alternate names and place-name aliases is helpful for people who know a landmark’s name but not its address. It also helps in situations where a street or feature has more than one name.