Complexity: Beginner
Data Requirement: ArcGIS Tutorial Data for Desktop
Data Path: c:\ArcGIS\ArcTutor\Geocoding
Goal: Create an address locator using alternate name and place-name aliases and find locations using those aliases.
When you create an address locator, you can use alternate names and place-name aliases. Place-name aliases let you link famous place names to street addresses, like museums, hospitals, or landmarks. When geocoding an address, the place-name alias table is checked first. If a place-name is found, the street address from the place-name alias table is geocoded. Similarly, alternate names can be set for features like streets or cities in the reference data. When geocoding an address, the alternate name table is also checked to find potential matches where streets or cities have more than one name.
Get the data
The data for this tutorial can be downloaded from arcgis.com.
- Go to the item description page of the geocoding tutorial data on arcgis.com.
- Click Open > Download, and save the file locally.
- Unzip the downloaded file.
Create an address locator that uses alternate names and place-name aliases
In this task, you’ll create a new address locator that uses alternate street names and place-name aliases. You’ll then use it in ArcMap to find addresses.
- In ArcCatalog, browse to the Geocoding folder containing the Atlanta geodatabase.
- Right-click in the empty space of the Contents tab inside the Geocoding folder, and click New > Address Locator. The Create Address Locator dialog box appears.
- On the Create Address Locator dialog box, click the Browse button next to the Address Locator Style text box.

The Select Address Locator Style dialog box appears.
- Choose the US Address – Dual Ranges address style.
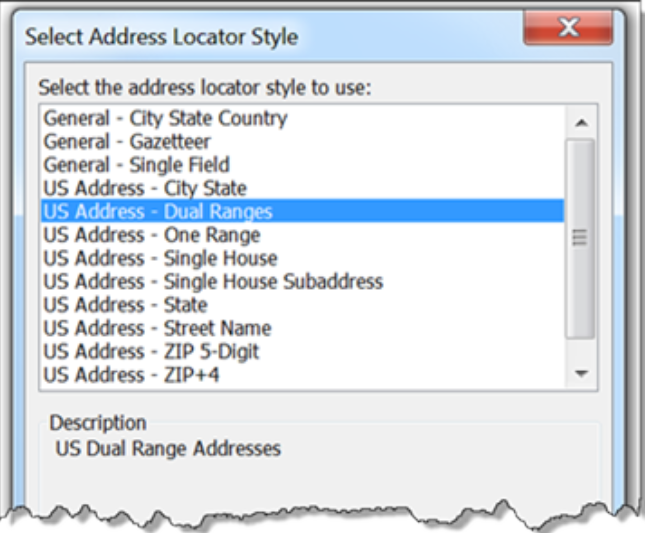
- Click OK.
- Click the Browse button next to the Reference Data text box to open the Reference Data dialog box.
- Browse to the Atlanta file geodatabase, choose the streets feature class, and click Add.
- On the Create Address Locator dialog box, click the arrow under the Role column heading and choose Primary Table.
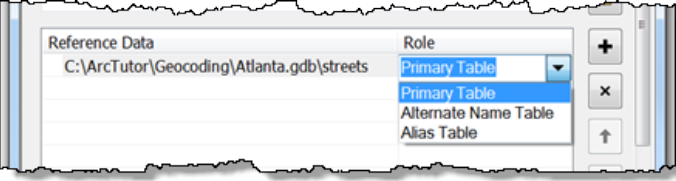
- Repeat steps 6 and 7, but this time browse to and add the altname table in the Atlanta geodatabase.
- Click the arrow under the Role column heading for the altname table and choose Alternate Name Table.
- The Field Map section should be completed automatically. If not, select the appropriate field in the reference data for each field. Make sure the JoinID fields for the Primary Table and Alternate Name Table are mapped properly. If they aren’t, follow these steps:
- Click the arrow under the Alias Name column heading for the Primary Table: Altname JoinID field and choose streets: JOINID.
- Click the arrow for the Alternate Name Table: JoinID field and choose altname: JOINID.

The JOINID field in the altname table and the JOINID field in the streets feature class are used to relate the records in the altname table to the records in the streets feature class.
- Repeat steps 6 and 7, but this time browse to and add the altcity table in the Atlanta geodatabase.
- Click the arrow under the Role column heading for the altcity table and choose Alternate City Name Table.
- The Field Map section should be completed automatically. If not, select the appropriate field in the reference data for each field. Make sure the JoinID fields for the Primary Table and Alternate City Name Table are mapped properly. If they aren’t, follow these steps:
- Click the arrow under the Alias Name column heading for the Primary Table: City Altname JoinID field and choose streets: JOINID.
- Click the arrow for the Alternate City Name Table: JoinID field and choose altcity: CITYID.

The CITYID field in the altcity table and the CITYID field in the streets feature class are used to relate the records in the altcity table to the records in the streets feature class.
- Repeat steps 6 and 7, but this time browse to and add the place_aliases table in the Atlanta geodatabase.
- Click the arrow under the Role column heading for the place_aliases table and choose Alias Table.
- The field mapping for the place_aliases table should be completed automatically. If not, select the appropriate field in the reference data for each address locator field. For the field named Alias Table: Alias, click the arrow under the Alias Name column heading and choose place_aliases: NAME. This field contains the names of the places you can use to geocode.

Next, set the path for the output address locator.
- Click the Browse button next to the Output Address Locator text box.
The Output Address Locator dialog box appears. - Browse to the Geocoding folder containing the Atlanta geodatabase, type Atlanta_AltName as the address locator name, and click Save to accept the change and close the dialog box.
- Click OK to start the process of creating the address locator. When the process finishes, the new Atlanta_AltName address locator appears in the Geocoding folder alongside the Atlanta file geodatabase.
- Close ArcCatalog.
You can now use this address locator to find where an address is located on a map.
Find locations using alternate street names, alternate city names, and place-name aliases
In this task, you’ll use the Atlanta_AltName locator you just created to find addresses.
- Open a new map document in ArcMap.
- Add the streets feature class from the Atlanta geodatabase to your map.
- Click the Find button on the Tools toolbar.
- On the Find dialog box, click the Locations tab.
- Click the Browse button next to the Choose an address locator drop-down box. The Add Locator dialog box opens.
- Browse to the Geocoding folder, choose the Atlanta_AltName locator, and click Add.
A street may have more than one name. For example, Atlanta Blvd is an alternate name for Old 10th St NE in the Atlanta database. With the Atlanta_AltName address locator, 30 Old 10th St NE and 30 Atlanta Blvd will both find the same location.
- Click the Browse button next to the Output Address Locator text box.
The Output Address Locator dialog box appears.

- Right-click the candidate in the candidate list and click Add Point. A graphic point representing the address’s location appears on the map.
- Type 30 Atlanta Blvd Atlanta in the Full Address text box and click Find to search for candidates.
- Right-click the found candidate and click Flash.
You can see that both addresses are matched to the same location on the map.
When searching for an address, the city name or neighborhood name within the city could be used to locate the address. For example, Sherwood Forest is a neighborhood within the city of Atlanta listed in the alternate city name table in the Atlanta database. With the Atlanta_AltName address locator, 192 Little John Trl NE, Atlanta and 192 Little John Trl NE, Sherwood Forest will both find the same location.
- Type 192 Little John Trl NE, Atlanta in the Full Address text box and click Find to search for candidates.

- Right-click the candidate in the candidate list and click Add Point. A graphic point representing the address’s location appears on the map.
- Type 192 Little John Trl NE, Sherwood Forest in the Full Address text box and click Find to search for candidates.
- Right-click the found candidate and click Flash. You can see that both addresses are matched to the same location on the map.
In addition to geocoding addresses, you can also geocode place-names defined in the place_aliases table.
- Type Atlanta Market in the Full Address text box and click Find to search for candidates.
- Right-click the first found candidate and click Add Point. The location appears on the map as if you had typed its complete address.
- Click Cancel to close the Find dialog box.
Creating locators that use alternate names and place-name aliases is helpful for people who know a landmark’s name but not its address. It also helps in situations where a street or feature has more than one name.