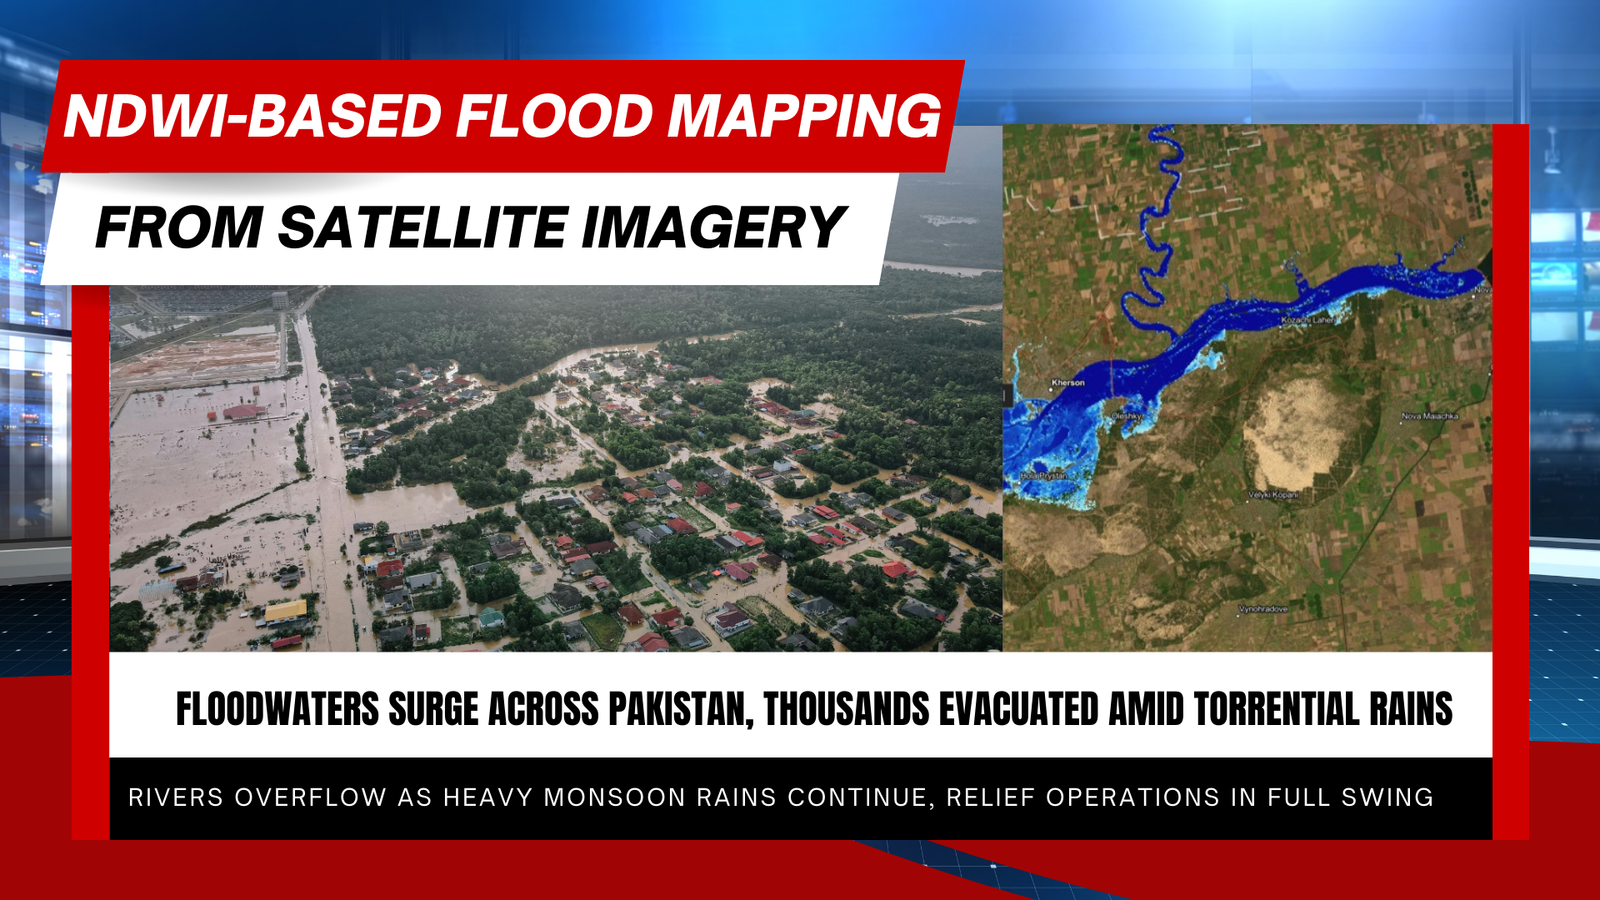
The Normalized Difference Water Index (NDWI) is a widely used remote-sensing index that helps detect and measure water—both as surface water and as moisture in vegetation—using satellite imagery. Like the more familiar NDVI (Normalized Difference Vegetation Index), NDWI exploits the fact that different surfaces reflect sunlight differently across spectral bands. That makes it a powerful, simple tool for mapping water and identifying flooded areas.
What is NDWI?
NDWI compares reflectance in two satellite bands to highlight water features. There are two common NDWI formulations:
- Surface-water NDWI (McFeeters, 1996): uses the green and near-infrared (NIR) bands to emphasize open water and suppress vegetation.
Formula:NDWI = (Green − NIR) / (Green + NIR) - Vegetation-water NDWI (Gao, 1996): uses NIR and shortwave-infrared (SWIR) bands to estimate liquid water content inside leaves (useful for plant moisture/stress monitoring).
NDWI values range from −1 to +1. Higher (positive) NDWI values typically indicate water or wetter surfaces; negative values usually represent dry soil, built surfaces, or dense vegetation.
Key applications of NDWI
NDWI is versatile and used across many fields:
- Flood and surface-water mapping: Detects water extent during floods and tracks changes in lakes, rivers, and reservoirs.
- Water resource management: Monitors seasonal and long-term changes in surface water for planning and allocation.
- Agriculture: Identifies crop water stress and irrigation needs by tracking leaf moisture.
- Wetland and ecosystem monitoring: Assesses wetland extent and health.
- Climate studies: Provides time-series data on surface water and vegetation moisture to study hydrological impacts from climate change.
How NDWI is used to map flooding (with Google Earth Engine code you can paste)
Mapping floods with NDWI in GEE usually follows these steps: acquire imagery, mask clouds, compute NDWI, classify water with a threshold, post-process results, and compare pre- and post-flood maps to identify newly inundated areas. Below is a short explanation followed by a complete Earth Engine script you can paste into the GEE Code Editor.
Short process (GEE-ready)
- Acquire imagery — pick a sensor with green and NIR bands (e.g., Sentinel-2 B3 = green, B8 = NIR or Landsat where Green = B3/B2 and NIR = B5/B4).
- Preprocess & mask clouds — use the QA band (QA60 for Sentinel L1C) or scene classification to remove cloudy pixels.
- Compute NDWI —
NDWI = (Green - NIR) / (Green + NIR)(usenormalizedDifferencein GEE). - Classify water — apply a threshold (commonly
> 0or tuned value) to get a boolean water map. - Post-process — remove noise (small speckles), apply morphological filters or connected-component size filter, vectorize if needed.
- Compare pre vs post —
new_inundation = postWater AND NOT preWatershows newly flooded pixels.
Copy-&-paste GEE script (Sentinel-2 L1C example)
// ============= User Inputs =============
var lon = 73.50949812282687;
var lat = 31.11546256819306;
var point = ee.Geometry.Point([lon, lat]);
var bufferMeters = 1000;
var aoi = point.buffer(bufferMeters);

// ============= Cloud Mask Function =============
// Sentinel-2 QA60 band
function maskS2clouds(image) {
  var qa = image.select('QA60');
  var cloudBitMask  = 1 << 10; // bit 10
  var cirrusBitMask = 1 << 11; // bit 11
  var mask = qa.bitwiseAnd(cloudBitMask).eq(0)
              .and(qa.bitwiseAnd(cirrusBitMask).eq(0));
  return image.updateMask(mask).divide(10000)
              .copyProperties(image, ['system:time_start', 'MGRS_TILE']);
}

// ============= Function to get best image =============
function getBestS2(collection, startDate, endDate, tile) {
  var s2 = ee.ImageCollection(collection)
    .filterBounds(point)
    .filterDate(startDate, endDate)
    .filter(ee.Filter.eq('MGRS_TILE', tile)) // ensure same tile
    .filter(ee.Filter.lt('CLOUDY_PIXEL_PERCENTAGE', 40)) // stricter clouds
    .map(maskS2clouds)
    .sort('CLOUDY_PIXEL_PERCENTAGE');
  return ee.Image(s2.first());
}

// ============= Collections and Date Ranges =============
var s2Collection = 'COPERNICUS/S2_SR_HARMONIZED';

// First, find the tile covering the AOI
var oneImage = ee.ImageCollection(s2Collection)
  .filterBounds(point)
  .first();
var tileID = oneImage.get('MGRS_TILE');
print('Tile covering AOI:', tileID);

// March 2025
var marchImage = getBestS2(s2Collection, '2025-03-01', '2025-03-31', tileID);

// Post-flood (after Aug 20, 2025)
var floodImage = getBestS2(s2Collection, '2025-08-20', ee.Date(Date.now()), tileID);

// ============= NDWI & Classification =============
function computeNDWI(image) {
  return image.normalizedDifference(['B3', 'B8']).rename('NDWI');
}

var ndwiMarch = computeNDWI(marchImage);
var ndwiFlood = computeNDWI(floodImage);

// ============= Visualization =============
var visRGB   = {bands: ['B4', 'B3', 'B2'], min: 0, max: 0.1, gamma: 1.2};
var visNDWI  = {min: -1, max: 1, palette: ['brown', 'white', 'blue']};
var visClass = {min: 0, max: 1, palette: ['grey', 'blue']};

Map.setCenter(lon, lat, 12);
Map.addLayer(aoi, {color: 'red'}, 'AOI buffer');

Map.addLayer(marchImage, visRGB, 'March 2025 (True color)');
Map.addLayer(ndwiMarch, visNDWI, 'March 2025 NDWI');

Map.addLayer(floodImage, visRGB, 'Post-Flood (True color)');
Map.addLayer(ndwiFlood, visNDWI, 'Post-Flood NDWI');

// Water classification
Map.addLayer(ndwiMarch.gt(0), visClass, 'March 2025 Water');
Map.addLayer(ndwiFlood.gt(0), visClass, 'Post-Flood Water');

// ============= Print Dates & IDs =============
function printImageInfo(img, label) {
  print(label, img.get('system:index'), img.get('system:time_start'));
}
printImageInfo(marchImage, 'March Image');
printImageInfo(floodImage, 'Post-Flood Image');
Notes & tips
- Threshold tuning:
ndwiThreshold = 0.0is a good starting point, but tune it for local conditions. Use higher thresholds to reduce false positives from dark soils or shadows. - Cloud masking: This script uses Sentinel-2
QA60bits for a simple mask. For more robust masking use theSCLband (Sentinel-2 SR) ors2cloudlessclassification. - Sensor choice: Swap to Landsat if you need a longer historical record (use corresponding green & NIR bands and scale for Landsat).
- Scale/resolution: Sentinel-2 uses ~10 m for B3/B8; adjust
scalein statistics & Export calls accordingly. - Post-processing: You can vectorize inundation by using
reduceToVectors()or smooth with focal filters to remove noise. - Validation: Always validate outputs with high-resolution imagery or ground truth if available.
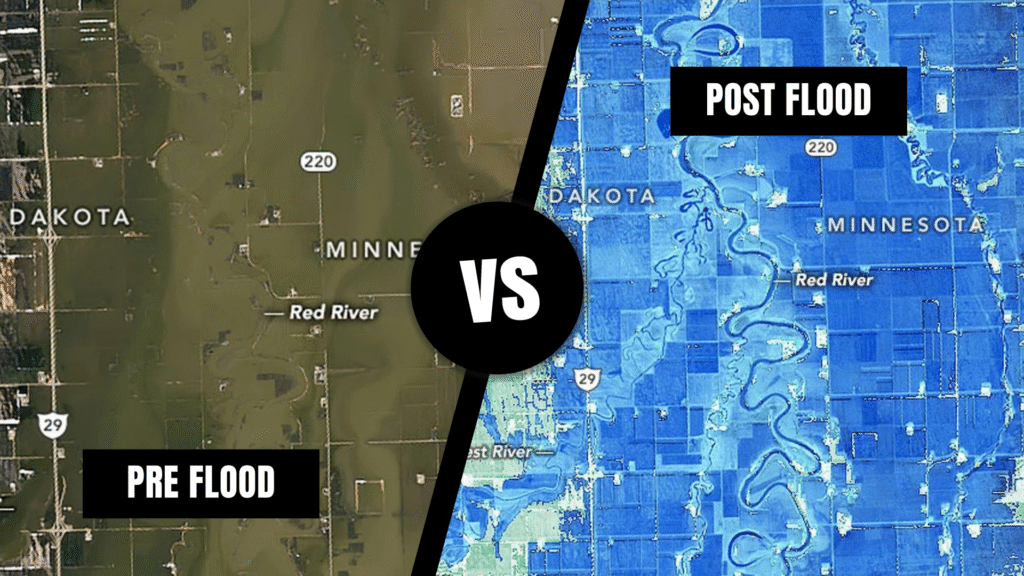
Real-world example
During the April 2020 floods along the Red River in parts of Minnesota and North Dakota, researchers used Landsat 8 imagery and NDWI to classify flooded vs. non-flooded areas. Mapping NDWI values allowed them to identify and visualize the extent of flooding across farmland and floodplain—making it much easier to quantify impacted areas than by relying on optical imagery alone.
Practical tips
- Choose the right sensor: Higher spatial resolution (e.g., Sentinel-2) gives finer detail; Landsat offers a longer historical record.
- Mask clouds and shadows: Clouds strongly affect NDWI; masking improves accuracy.
- Tune thresholds locally: Global rules don’t always work—validate with ground data or high-resolution imagery.
- Combine indices: In some cases, combining NDWI with other indices (e.g., MNDWI, AWEI) and spectral tests improves discrimination between water, built surfaces, and dark soils.
References
- Gao, B. C. (1996). NDWI—A normalized difference water index for remote sensing of vegetation liquid water from space. Remote Sensing of Environment, 58(3), 257–266.
- McFeeters, S. K. (1996). The use of the Normalized Difference Water Index (NDWI) in the delineation of open water features. International Journal of Remote Sensing, 17(7), 1425–1432.
- Zhou, Y., Dong, J., Xiao, X., Xiao, T., Yang, Z., Zhao, G., … & Qin, Y. (2017). Open surface water mapping algorithms: A comparison of water-related spectral indices and sensors. Water, 9(4), 256.