I have a bit of a love-hate relationship with labeling. I love that it makes my maps clearer, but I hate how tedious it can be to place labels exactly where I want them. Hopefully, this article will help clear up some of the confusion.
Labeling Basics in ArcGIS Pro In general, there are two types of labeling in GIS:
Automatic Labels
This is when the GIS software places the label for you. You choose an attribute to label, and it displays the label. When you update that attribute, the label updates automatically.
Annotations and Graphics
When you convert labels, you can create annotations or graphics. The good thing about annotations is that you can place labels exactly where you want them. The downside is that they’re static and don’t update with your attribute table.

We’re going to focus on automatic labeling in ArcGIS Pro.
Label Placement and Conflict Resolution
Labeling in ArcGIS Pro can feel frustrating, like you’re stuck running on a hamster wheel. You keep working but don’t seem to get anywhere.
Labels are an important part of a map, so they need to be placed carefully. However, if a map has too many labels, it can become confusing.
Here are some of my best tips and tricks. We’ll also look at how to solve some common labeling problems.
1. You Can’t See Your Labels
If you can’t see your labels, don’t worry—this happens to me all the time. To fix this issue, you need to ensure ArcGIS Pro never removes labels. Start by right-clicking your layer in the table of contents and selecting “Labeling Properties.” This will open the labeling panel on the right side. Then, click on the “Position” tab and select the “Conflict Resolution” button. Finally, under the “Unplaced Labels” drop-down menu, choose “Never Remove (Place Overlapping).” This will make sure your labels always appear, even if they overlap.

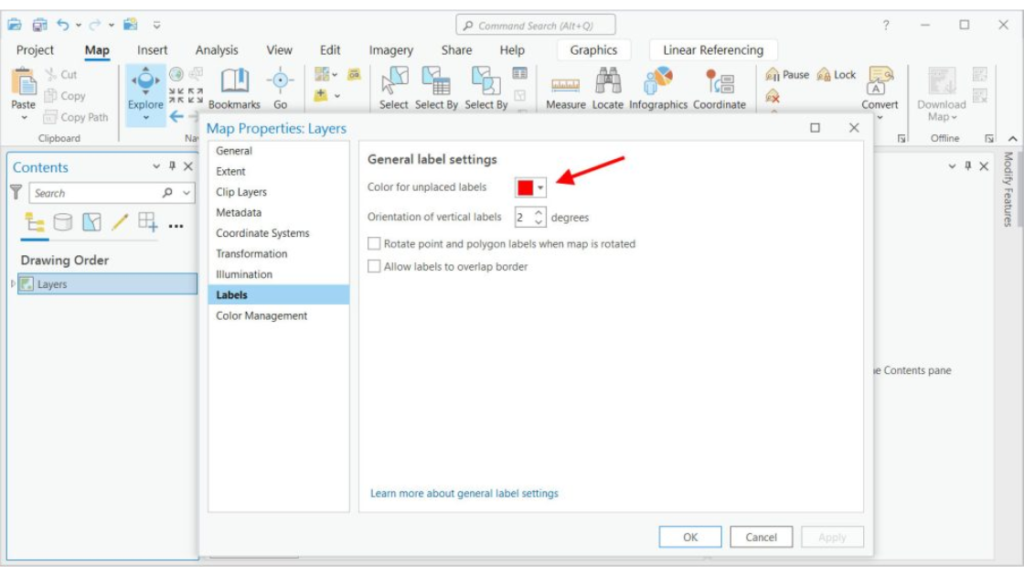
2. Unplaced Labels Are Red
By default, ArcGIS Pro shows unplaced labels in red. If your map has red labels you don’t want, you can change their color.
First, right-click the data frame in your table of contents and select “Properties.” Then, go to the “General Label Settings” and change the “Color of Unplaced Labels” to another color, like black.
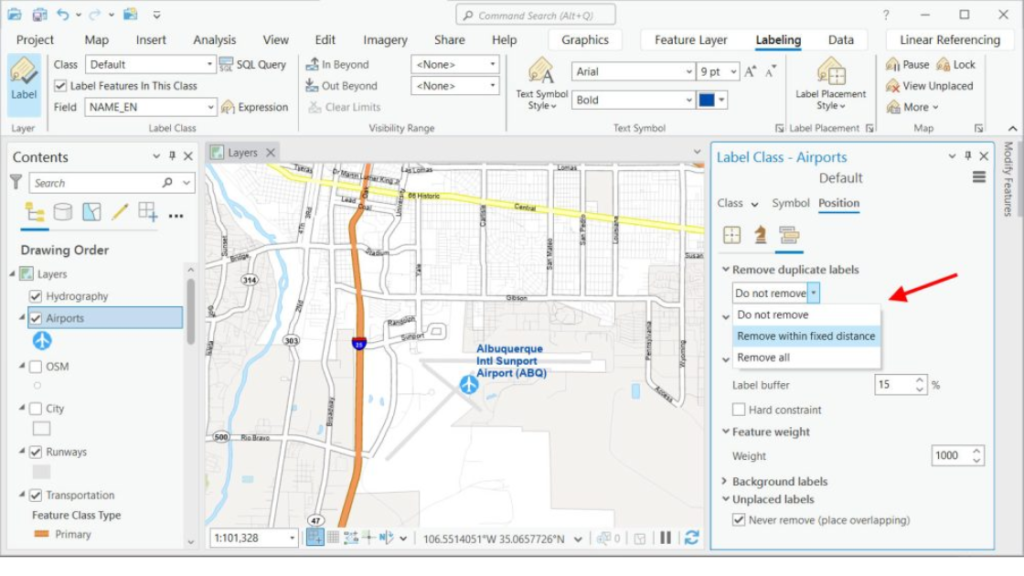
3. Duplicate Labels
Dealing with duplicate labels in ArcGIS Pro is a common problem, especially with datasets that have repeating values. To fix this, right-click your layer in the table of contents and select “Labeling Properties.” Then, go to the “Position” tab and choose one of these options:
- Do Not Remove – Keeps all duplicate labels.
- Remove Within a Fixed Distance – Removes duplicate labels within a set distance.
- Remove All – Removes all duplicate labels in the layer.
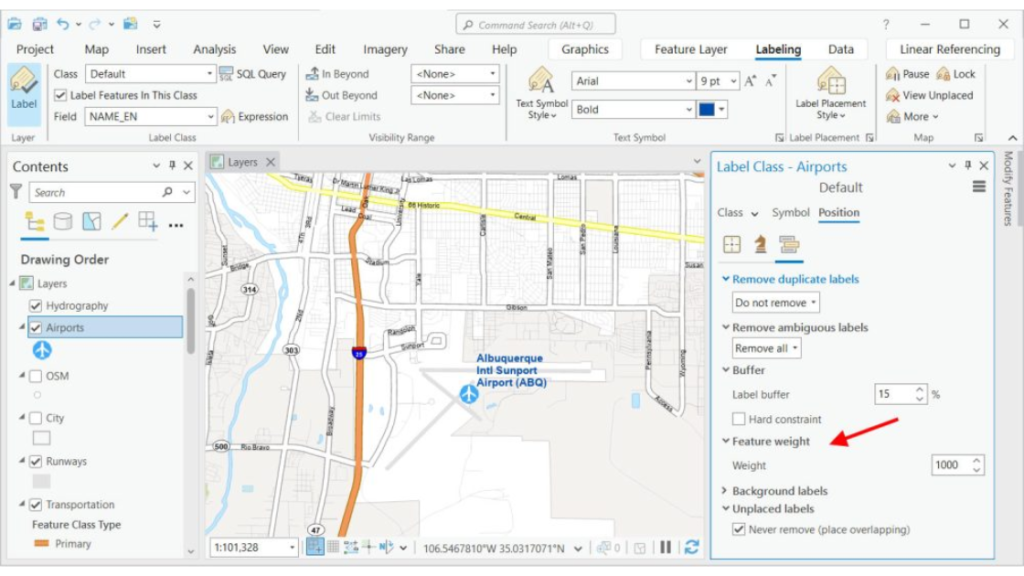
4. Setting Feature Weights
Setting feature weights can make your map easier to read. Features with higher weights are less likely to have labels placed over them.
For important features in your maps, set their feature weights to the highest level. This will help prevent labels from being placed on top of them.
5. Overlapping Labels and Fitting Strategies
Dealing with overlapping labels can be tricky. Sometimes, it’s worth converting labels to graphics, but that can be very tedious and time-consuming.
ArcGIS Pro offers “fitting strategies” to handle overlapping labels on your maps. You can choose which ones to use and prioritize them by importance:
- Stacking: Breaks labels into multiple lines based on spaces, commas, or other separators.
- Font Compression: Condenses text by reducing the space between characters.
- Font Reduction: Decreases the label font size.
- Abbreviation: Uses shortened forms of words to save space.

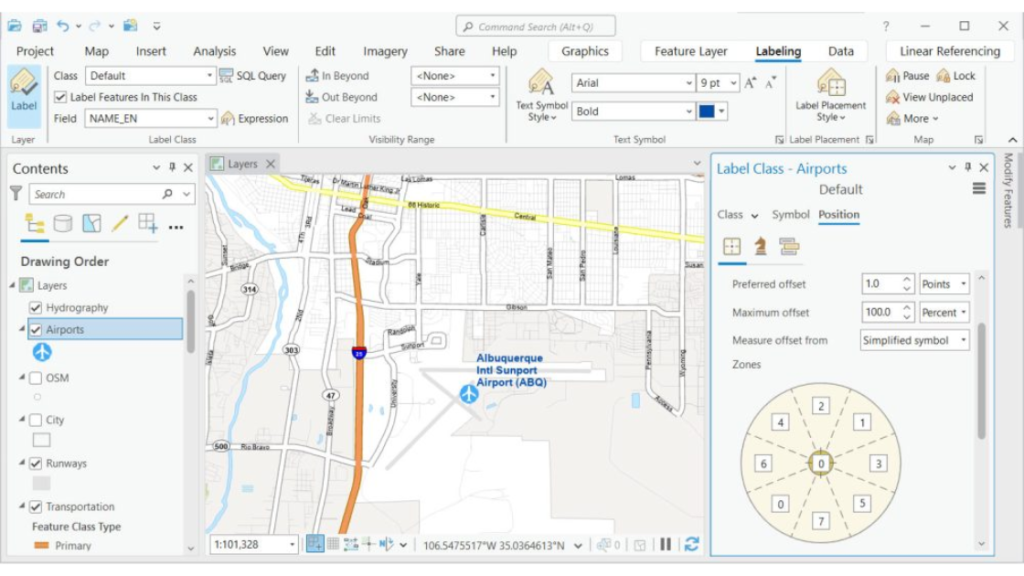
Label Placement Position
ArcGIS Pro lets you choose where and how to put labels on a map. Here are some of the ways you can place labels:
- Anchor Points: Anchor points change where labels are placed in relation to features. You can put labels above, below, or right on top of the features.
- Offsets: Offsets set how far labels are from the features. This helps make the map clearer by reducing clutter around points.
- Alignments: Alignment options (left, right, center) are based on the anchor points. These choices affect how easy the labels are to read and how they look.
- Curvature: Line labels can follow the curves of a line. You can also place them perpendicular to the line or have them repeat along the line.
- Leader Lines: If labels can’t be placed right next to their features, leader lines can connect the labels to the features.
Labels for Your Maps
Maps with good labels are easier to read and understand. Without labels, it would be hard to find anything. Placing labels in the right spots makes maps clear and nice to look at.
By carefully placing labels, map makers can create maps that show information well. This involves using anchor points, offsets, alignment, priority settings, and more.
Do you have any questions about labeling in ArcGIS Pro? We’d love to hear from you in the comments section below.